I've not been totally useless these past days, even though I've been feeling pretty grotty. However there were those stumpwork mushrooms to work on. These, as mentioned in my previous post, were all supplied by
Kay Dennis in the form of ready to work kits for our Saturday workshop. Here are a couple of pics of work in progress
There's the canvaswork mushroom, OK it doesn't look much like a mushroom at the moment, but this is before I cut it out and shaped it.
Then there's the embroidered mushroom - yes I know it looks like a Christmas Bell. We were told to be as fanciful as possible ... dare I mention, the phrase "magic mushrooms" was heard, and this in a room of sedate middle class ladies all past a certain age! I had limited threads to use, having put the "going to a workshop kit" together with a bit too much abandon, not knowing what to expect. I'm rather pleased with the sheen of the pink thread; it seems to work with the, hurriedly coloured with what came to hand, pale green background.

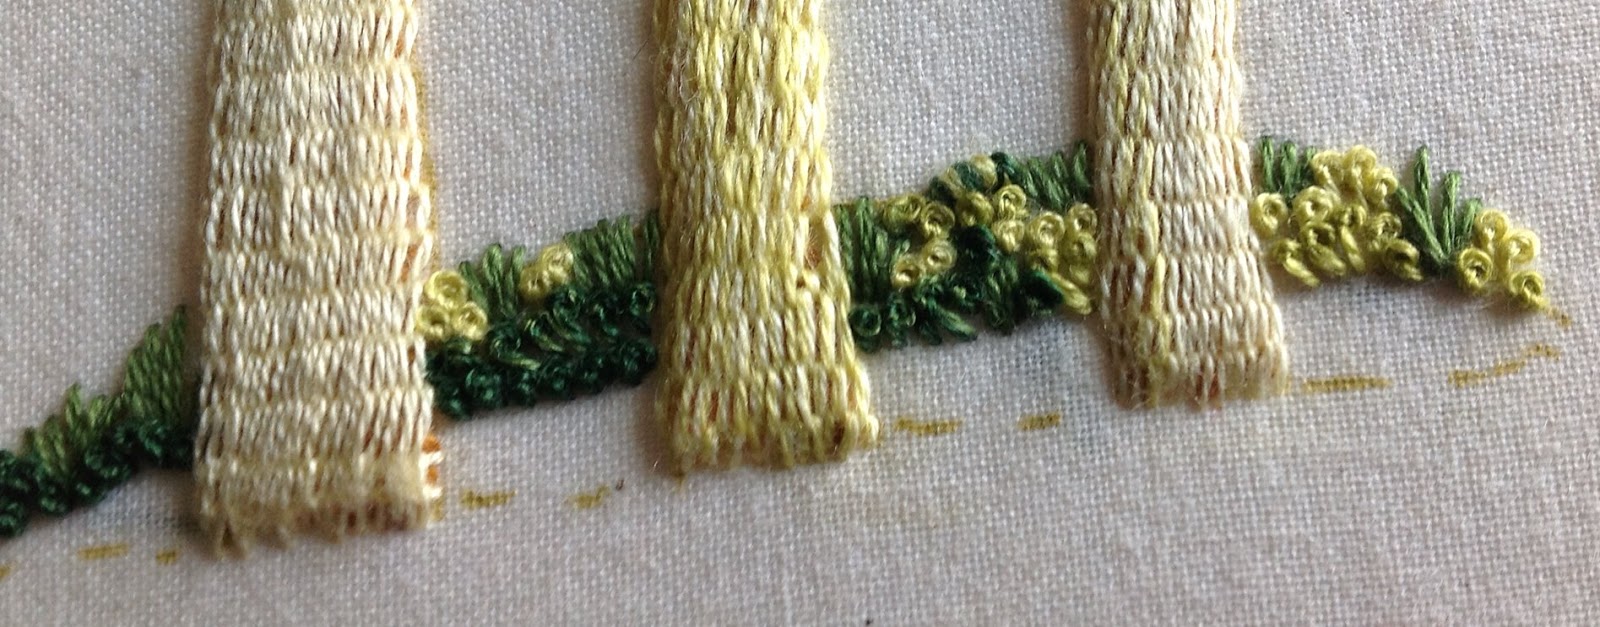
And here are the stems - which give you an clearer idea of how the mushrooms are shaped - you can see the felt form for the first one already stitched onto the ground fabric. This bit I found the most interesting as I'd not done anything quite like it before. We started with rows of chain stitch worked up and down within the pre-printed lines given for the stems. Then we laid bars of thread (a single strand of 6 stranded floss) evenly across the chain stitch. Then comes the top layer of raised stem stitch (there's a good photo tutorial on this
here) again worked on the first one with a single strand of embroidery floss. The initial foundation of chain stitch provides the plumpness (lovely word that) over which you work the stem stitch. In the middle stem I tried using two strands of floss to enable me to vary the colour a bit. I've shown the final stem before I completed the top layer so you can see how the technique comes together. I love the finished result - not because I think I've been particularly clever, but because using such fine thread gives a wonderful effect that mimics closely that silky/fibrous texture of mushroom stems. Since I worked these bits I've completed the mushrooms; the final one is shaped "fancy" fabric supplied by Kay, folded around a felt form. There are also little shapes filled with French knots to resemble the ground the mushrooms are growing from. The next stage is to stitch all these separate elements onto the ground fabric to complete the picture.
Then there's Cecil's quilt. I finished the piecing today - all now pressed and ready to layer with wadding and backing
I picked up some delightful fabric from
Fabric Design in Matlock Bath. It's actually a furnishing fabric, but I thought it the perfect thing for a lady who has spent most of her life working in one of our lovely National Trust historic homes. I think the little vignettes of pastoral folk will delight her feeling for history, her pleasure in fine furnishings and her well developed sense of whimsy.

Whilst all this creativity has been going on, the garden has been settling itself down for the winter. We've been having an exceptionally wet Autumn, following a pretty wet summer and we Brits do seem to love moaning about the weather endlessly. I'm not going to do that - I'm not a great sun lover, I find constant sunshine a bit boring to be honest, much preferring the variety that comes with moisture in the air; it keeps this country green, gives us wonderful piled high clouds, the delights of shade and sunlight, rainbows, mists and mellow fruitfulness. Certainly this little fellow is appreciating the full growth and resulting seeds
as for the resident squirrels, they have been beside themselves with delight at the harvest from the yew tree
performing the most daring acrobatics to get at that lovely, luscious, jewel like fruit