Showing posts with label dyeing. Show all posts

Sunday, 3 August 2025

A stitching update

 I’m sorry for my absence, our life together has been overtaken with difficulty just now; living has taken on a new priority, and my dearest heart is quite unwell, so we are going along quietly together. In the in between times I am still stitching where I can. 

My most recent project was to create a hanging for his bedroom from some delicious African fabrics I bought years ago with him in mind. He recently asked for someting to replace a lovely old family portrait of his great grandfather as a little boy in Regency frock. Little Arthur has returned to a house he previously lived in, much to the delight of the house owner. The result was this; some giraffes, which are an old private symbol between us, African fabrics, because he grew up in Africa, and three little four patches, composed from fabrics I used in his three great grandchildren’s quilts, so they are with him in spirit. It is another little “story quilt” with fabric links which means something to us. 


Having completed that, I needed something new to work on, or perhaps something in progress to mover further on. You will remember this series from here, here and here.


I am hoping to begin the next phase with this piece of cloth, more gleanings from that first quilt, and not quite as pale as it appears here.


I have cobbled it together with Jude’s Glue Stitch, a regular web of tiny stitches and long intervals which creates a single piece of cloth from several little bits, all held down on a base cloth, here calico. It leaves a little grid of tiny stitches on the front, but they get subsumed by embroidery, and it is a much nicer cloth to stitch on than if you bonded them down with adhesive webbing, however fine.
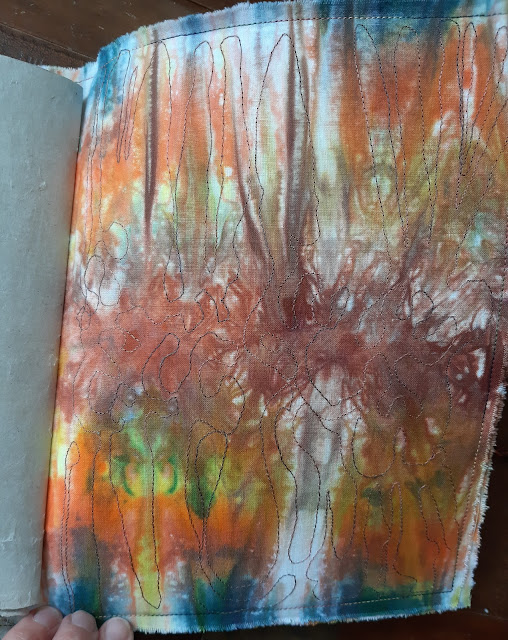
I think the three pieces will sit rather well together when finished

I am taking  another Stitchtopia trip in a week’s time, just eight days, and my dear heart’s daughter will take care of him while I am away. We will be knitting in the Faroe Islands, and I will be meeting up with a few previous fellow travellers, so much to look forward to, but I will also be spending time in airports, so wanted something to take along to stitch. I’m hoping this will work. 

Saturday, 11 May 2024

Designing a series from scraps

After adding some more stitch to my Honouring Christine piece, I am still working with scraps of the same fabric from that original course. This next piece was a trial to see how Mistyfuse might work to hold the various scraps of fabric together on an underlying base of "harem cloth" a fine muslin cloth which Jude uses regularly. I found that layer of glue, although ultra fine, still had a tendency to catch the tread a little on its way though and make the fabric stiff, though that got less annoying the more I handled it. For some reason I think of this piece as Sea Flowers, not sure why.


I did the designing for this on a graphics programme on my iPad: in this case the free version of Sketchbook, though I'm sure other equally valid apps are about. As long as you have layers, a simple selection of brushes and the ability to pick colour you have all you need. In the screenshot below there are five different layers, the top four holding an element of the next section of stitching I was trying out - the flower to the right and the fly stitch and running stitch in the centre and top. An earlier incarnation with a more fleur-de-lys shaped flower was quickly rejected without any reverse stitching required. Then I could tack some boundaries onto the cloth and stitch away knowing that I understood where it was going.


The second bit of stitching began on harem cloth (the trilithon in the centre) I extended the design by incorporating some surroundings, using "glue stitch" to combine all the layers rather than Mistyfuse. Below I have pinned down a printed version of  my stitch design from the iPad so that I can tack the next circle (cut away from the paper) to be stitched once the paper is taken away.


And here is where this is going - Moonhenge. I am unconvinced by the stitching in the reflected moon at the base, it seems to disrupt too much so I may take that out and just add some circular running stitch. 


Both still to be bound somehow.

Such a long time ago, using Connie and Harry's sheets for fabric as I was so unsure of whether the results would be usable. There may be another piece before I finish. An accidental series.

If you are interested in the memorial book for Christine, it should be on display at the Festival of Quilts this year if it is accepted into the "Quilt Creations" category. Twenty four of us have banded together to stitch or weave a piece which exemplifies the creativity which Christine fostered in each of us at Studio 11. We had a meeting this week to review all the pages of the book prior to assembly and were thrilled at the variety and quality of each artwork. Do pay it a visit if you go to FOQ this year, and treat yourself to the Christine Chester retrospective gallery which will also be part of the show. You might catch me stewarding while you're there.

Thursday, 14 March 2024

Honouring Christine

 I'm sorry for my recent silence. it has been a busy several months and I always find that winter saps my creative energy. In the intervening time I have been involved with a group of Studio 11 folk, all of whom are missing Christine, the Studio and that sense of fellowship which came with it. She truly achieved what she set out to do all those years ago.

We felt we would like to do something to honour her in some way and, after several ideas were mooted, we have fixed on creating a book in memory of her. Each of us are stitching patchworking or weaving something which embodies the creative freedom and teaching she gave us. Each piece, no larger than 8 inches each way, will be attached to a page of khadi paper: those pages will be assembled into a book in honour of her. We are entering it into the "Quilt Creations" section in Festival of Quilts this year, where it will be displayed. There should also be a link with either the retrospective gallery of her work (do come and see it if you are going to FOQ), or the Creative Textiles Studio where Christine was a regular tutor. 

Following that we have agreed that the book will be given to Christine's family as a lasting memorial to her and as an expression of our gratitude for all that she gave us.

I thought and thought about what I wanted to do. In the end I felt the most fitting tribute would be to use some of the fabrics I dyed in the very first course I did with her; "Tie Dye Mini Quilt", way back in 2012 when she first opened the studio. I had no idea what a wonderful journey she was going to encourage me in, and I have valued every minute I spent in the studio since.

I am calling this "Moonflowers" and have kept it very simple. Minimal stitching enhances what is already there, and I have so enjoyed creating this; Christine's voice in my ear encouraging me and memories of her wisdom and bright heart pulling us all forward in our creative journeys.


I hope it will be a fitting addition to this book which will enclose our creativity and be a memorial to Christine's inspiring teaching.

Saturday, 9 September 2023

Ditchling Shibori

I had the most delightful time, last weekend, at Ditchling Museum of Art and Craft taking a course in shibori and indigo with Rob Jones of Romor Designs

It was a beautiful day, cloudy and cool first thing so Ditchling felt slightly mysterious, textures almost more apparent because of the lack of shadows.


Nestled in the South Downs, I have been meaning to visit the Museum for years, but never managed it. You go swooping carefully from the top of the Downs, down and further down through green fields, hedgerows, trees and a scattering of slightly alarming bends in the road. Textures of flint and blowing grass; stone and time; taste of blackberry.

The day spent with Rob and my fellow classmates, stitching, binding, dipping and timing was quite delightful. We used strong thread as we tied objects into the fabric, or pulled up points to wrap, then bound tightly; we stitched careful rows, and drew up the thread; fabric was creased or folded. All this activity provided seven little bundles, the pressure from the bindings acting as a resist to the dye. These we dipped in the indigo vats Rob had prepared. He managed the sequence of the day so that we had stitching sessions, followed by dipping in the morning and afternoon. My gloves came home the most wonderful colour, I can't bear to wash it off! 

There was a definite process for dipping our bundles; in for four minutes, rest for ten, but timings became a little haphazard, laughter was heard. I think some of mine might have had four or possibly five dips in the vat, but I really did lose count. Rob sometimes dips up to twelve times to achieve a deep rich dark indigo. All sorts of things are possible, and regular readers will know I've enjoyed adventures with shibori in the past. However combining the lovely focus of binding and stitching, with the fun of multiple hands waving their bound bundles under the surface of the indigo vat made for a highly enjoyable day. 


Seven little bits of fabric to play with.

The following day I sat in my sunny garden to unwrap my bundles and see what magic had happened. The fun of rinsing and unpicking, careful snippings of taut thread. The initial depth of shade can be misleading; loose dye will wash out, dry fabric is always lighter in shade than wet.


Sometimes you can just pop the binding off the very end off with a bit of a gentle tug


The fun of unfolding floppy wet fabric once the stitching has come out! 


After washing and drying, you'll see here that the blue is much paler. This does allow for the subtleties of the dye absorption to show themselves a bit more.


I so enjoy the whole process of shibori, there is a meditativeness about the stitching and, with indigo, the repeated dipping. In contrast to Procion dyeing, those multiple timed dips in the vat add a further level of process and of control which appeals to me. I am very happy with what I achieved there, happy with the extra things I learned, ideas I explored, and very happy too, to re engage with my textile mojo. 


But behind the joy, in counterpoint, comes sadness that Christine is no longer here to share the adventure. I am so glad I can still hear her delighted voice when something appealed to her (as it often did) tucked away in my memories.

Sunday, 13 August 2023

A book of pages

Some weeks ago I prepared a variety of papers with the intention of making a book, then the Festival of Quilts intervened and those papers have been sitting in my sewing room ever since. Yesterday I thought it was time to do something with them. After much research online into book assembly, and many distracting rabbit holes, I finally decided that I would make up four signatures and sew them into a soft fabric cover of some sort. Yesterday was spent folding pages, looking for suitable fabric for the cover, the aforementioned research and generally planning it all out.

Each signature, folded to A5 size, has some khadi paper, cartridge paper and one sheet of watercolour paper so there is some variety to work into.


They have been stitched down the centre with pamphlet stitch, which seemed the simplest option, and one I have used before on a smaller book. It is great fun folding everything together, then punching holes through all those layers with a bookbinder's awl. Those holes also had to be punched into the spine, in four rows with the same spacing, so I could insert each signature. 


The cover comprises some flexible pelmet Vilene with a piece of tray dyed fabric I did many, many moons ago in Studio 11, when I was still learning all the various techniques Christine taught us for getting colour onto cloth. I have used the brightest bit on the outside of the cover, and a quieter piece on the inside. They are layered together with Bondaweb so the fabric doesn't buckle when handled.


I did some very sketchy machine embroidery through all three layers, doing my best to echo the pattern on the outside. 


On the inside the lines of stitch seem more random, as they are following the pattern on the outside. Because of this, I used a quieter thread in the bobbin so they are less visible, but I still quite like the effect. 


The book is closed with a tie made from three strips of silk ribbon, chain stitched to form a loop at the start, then plaited to create the wraparound tie.


I left the soft torn edges of the fabric, as I love the frayed texture.

All in all I'm rather pleased with this, as I was really making it all up as I went along, learning along the way, which is what life is for I always think. I'm also very happy to have found a use for at least one of the many bits of fabric I have stored away.

I hope you have had a creative weekend

Friday, 17 February 2023

Exciting things ahead

I have rather been keeping a lid on this news, but in two weeks time today I shall be flying off to Japan for another two week trip with Stitchtopia! People I tell say they are very envious, and I think I feel rather envious of myself, truth be told. I have wanted to go there for such a long time, for so many reasons, and never thought this would be possible. I am both very excited, and a trifle terrified!

We will be seeing so many interesting things; several temples/shrines, gardens, Tokyo and Kyoto, a museum of quilt art, a weaver's studio, a papermaking workshop, a traditional Japanese dance and a visit to Arimatsu, the home of excellence in Shibori, which was established over 400 years ago. I am so thrilled to be visiting this particular place, as I have tried my hand at shibori from time to time, and will be deeply interested to see how it is done by the absolute experts.

We have been told in advance that gift giving is a long established tradition in Japan, and have been advised we should bring a small gift for our local guide and several good folk who will be hosting us or gifting us their expertise in workshops. Three of these are men, and I am packing gift sets of English tea for them. But for the women I have some small hand crafted items which I hope will bring pleasure.


For our local guide I am bringing a silk scarf which I died using the shibori technique. And for our other three hosts I have made little folded origami pouches with multiple pockets, secured with ribbon loops and some vintage buttons from Mum's button box.

We have also been advised that the wrapping is as important as the gift, and I was so pleased to find matching wrapping paper and tissue paper (in different shops) with butterflies fluttering amongst flowers. Each gift will be wrapped in tissue, popped into a little gold box and further wrapped, with some organza ribbon to secure it all. I do hope they bring pleasure. I also hope I'm not making the mistake of "carrying coals to Newcastle", since both origami and shibori are Japanese techniques. Included in each gift will be a very local fridge magnet with an image of Hastings, Bexhill, Beachy Head or the De La Warr Pavilion, to ensure they have something properly English in their little package.

Time permitting, I shall post a few pictures and commentary during the trip so you can share in some of my joys.

Tuesday, 23 August 2022

Project completed

Over the past year, there has been a slow moving project happening in stops and starts in my workshop space, in between other things. 

In August last year, my clever son in law built a box window seat in the bay window of their flat. Foam seating blocks were measured, cut and delivered to me with a request for covers. I suggested it might be nice to use the same design that I had used on the ring pillow for their wedding, the Triskele symbol, here on silk velvet.


Approval for this granted, there followed a period of testing and trialing colours and techniques. I used plain calico and wanted to achieve a mottled effect, and for there to be none of the undyed fabric visible. Their sitting room is green, so I had to get the green right, hence many pieces of fabric with many different layers of colour.


Once colour and technique were approved, my first task was to use long stitches to mark out the shape of the cushions, so I knew where my parameters lay. Then I stitched the spiral patterns which would be drawn up shibori style to create a resist once the dye was applied. To ensure there was no ground colour remaining I washed in colour to the areas where the spirals would sit, having soda soaked the fabric first, as this fixes the Procion dyes. Stage one complete.


Stage two was to pull up the shibori stitching, then crumple the fabric into a shallow tray and dribble in the first layer of colour, predominately a variety of soft greens. There was also some magenta, but this became rather pale once the fabric was washed out and the stitching removed. You can see below the piece which would become two side cushions. I didn't want the magenta as strong as in the trial pieces, but here it has turned into a tentative hint which would be swamped by the next layer


Next the stitching was reapplied in the same place and more magenta painted in as they both rather liked the contrast this produced. I did this on wet soda soaked fabric so the colour ran in patterns across the cloth.


Once again the stitching was pulled up as tight as possible (you need good strong thread). 


The fabric was carefully crumpled into shallow trays for the next layer of dye, a strong petrol green which, as before, would pool in the hollows, creating a variety of intensity in the final layer of colour.


I was very happy with the way the magenta highlighted the shibori circles, not too glaring, but enough to delight. You can see here the deeper colours which result from the crumpled fabric. Much more interesting than a plain overall green and the colours applied in previous stages, I hope, give life and variety to it all.


There followed, of course, all sorts of YouTube investigations on how to sew a box cushion, and how to mange zipper strips and the zipper pulls to achieve the long opening at the back: this was my first attempt at upholstery. I was helped greatly by two YouTube feeds, one from The Funky Little Chair, a wonderfully useful set of how to videos if you ever want to try your own upholstery. The other was an invaluable tutorial from Sew Sweetness addressing the thorny question of how you get the zipper tab onto that long strip of zipper tape - you simply need a fork! 

So, many lessons learnt, Dacron and stockinette applied to the foam blocks (absolutely vital) and covers completed, the final stage was to see if they fit. I think you'll agree they came out rather well, though I say so myself. I was thrilled to discover I seemed to have got it all right, and one of their three cats gave it all the seal of approval.

He, the cat, asked me to tell you that it made for a very comfortable resting place for the entire following day, and also to note that he doesn't usually look this disheveled. This is his summer clipped look, rather than his princely winter Maine Coon coat. 

The humans were pretty pleased too.